
Nothing hurts more than losing a race to a mechanical failure that a five-minute check could have caught. A loose Nerf bar, a slipped chain, or a wheel that backs off mid-corner does not just cost positions. It can end your day before the green flag even drops.
Complete reliability does not exist in racing. A disciplined pre-race routine still closes almost every gap that haste and assumption leave open. This guide walks through a full front-to-back inspection built specifically for LO206 sprint karts, along with the preventive habits that keep small issues from becoming season-ending ones.
A printable checklist is included near the end of this article.
Why "Wrench-Tight" Is Not a Torque Spec
Most pre-race checklists simply tell you to make sure everything is wrench-tight. That advice is not wrong, but it is vague, and vague is exactly what leads to over-torqued fasteners, stripped threads, and stress-cracked mounting tabs.
For reference, here is what you are actually working with on a stock LO206. The engine produces a maximum of 8.8 horsepower and 10 foot-pounds of torque. The rev limiter is set at 6,100 RPM. Factory timing is 29 degrees BTDC, compression ratio is 8.5 to 1, and the recommended fuel is 87 octane, ideally non-ethanol.
Full torque specs for head bolts, exhaust fasteners, and clutch hardware are published in the official Briggs Racing 206 rule set and tech documents, which are worth bookmarking alongside this guide. If you do not have a torque wrench in your pit box yet, it is one of the cheapest insurance policies in racing.
The Front-to-Back Walkdown
Work the same direction every time, starting at the front and moving toward the back. Keep a mental checklist or write one down. Do not rely on memory of what you checked last week. Karts vibrate loose over time, so something that was fine at the last race may not be fine now.
Bodywork, Bumpers, and Nerf Bars
Check all mounting hardware for bumpers, Nerf bars, and bodywork, since loose hardware here is one of the most common causes of parts flying off mid-race. Inspect bumper mounting tabs for stress cracks caused by fatigue. Replace any fastener that shows mushrooming, rounding, or corrosion. Zip ties are a cheap and effective form of redundancy on critical mounting points.
Wheels, Bearings, and Spindles
Inspect wheel bearings for corrosion, wear, or roughness. Spin each wheel and feel or listen for drag or grinding, which often signals a brake or bearing issue before it becomes visible in any other way. Torque all wheel nuts properly, especially after any tire change. Do not forget the main spindle nut holding the wheel hub, since it is rarely touched and easy to overlook.
Steering and Tie Rods
Shake the steering column and tie rods to check for play. Re-check jam nuts any time a tie rod adjustment is made. Looseness here means your driver is fighting the kart in every corner, often without realizing why.
Fuel and Brake Lines
Follow every line visually from source to destination, checking for cracks, chafing, and loose clamps. On the fuel system specifically, ethanol-blended pump gas is corrosive to carburetor internals and will vaznish over time if left sitting. If the kart will sit for more than a week or two, drain the bowl and stabilize the fuel system, a habit that comes straight from Briggs Racing's own preventative maintenance guidance. Also confirm that a fuel filter is actually installed, since it is the cheapest insurance against a clogged jet mid-race.
Throttle and Brake Cables
Confirm free travel on both cables with no binding. Lubricate the cables periodically, since a sticking throttle is a safety issue and not just a performance one. Verify that the throttle fully closes every time it is released. Check the master cylinder and brake pedal assembly for any sign of fluid leakage.
Seat and Mounting
Inspect the seat and seat stays for cracks. This is a structural and safety component, not just a comfort item.
The seat is the most critical part of tuning so take your time and provide a thorough inspection of the seat and anything that touches the seat. Furthermore, where the through bolts come through the seat, inspect the hole in the seat to make sure it’s not oblong or cracking. Where it mounts to the frame is where you will experience the most failures.
Underneath the Kart
Check the nose cone and skid area for debris ingress or mounting issues. Verify chain condition, tension, and retention. Confirm that engine mount fasteners and axle set screws are properly torqued, since a loose motor mount is one of the most common causes of a slipped or thrown chain. If you run a clutch, make sure the hub is seated firmly against the crankshaft shoulder. LO206 cranks are made of carbon steel, but the contact patch between the clutch and the crank is small. A hub that is allowed to float under load is a common and expensive way to damage a keyway.
Final Check on Stands
With the kart on stands, spin the rear wheels and watch for rubbing or looseness in the bodywork. Making small adjustments now prevents bigger issues from compounding later in the day.
Preventive Replacement: Do Not Stretch a Part's Life
While inspecting the kart, replace anything questionable rather than hoping it survives one more session. Wheel bearings, body mounts, bumper tabs, chain guards, and tie rods are inexpensive compared to the track time, or the race, that you lose when one of them fails.
Pay particular attention to the hardware that tends to get ignored until it fails all at once. This includes cotter pins, E-clips, and safety wire on throttle linkage, brake clevis pins, and suspension joints. Steering bushings and set screws also deserve attention, since they creep out of position with use and slowly degrade handling. If you run an oiled foam air filter, remember that it needs to be recharged periodically rather than left in place until it visibly looks dirty.
Cleanliness Is Not Cosmetic
Mud and moisture accelerate almost every failure mode described above. If you have run in wet conditions, do not just hose the kart off and call it done. Pressure washers push water into bearings, seals, and electrical connections just as easily as they remove mud.
Use compressed air and a leaf blower to fully dry components after washing, then re-grease anything that was disturbed in the process. Skipping this step is how a single wet race weekend turns into a bearing replacement two events later.
After Every Session: Debrief Like a Crew Chief
A quick pit lane walkdown after each on-track session catches problems while they are still small. Ask whether anything came loose, whether there was any new noise or vibration, and whether there is any visible leakage.
Keep a running log of what you find. Race day memory becomes unreliable by the third or fourth session of the weekend, and good intentions to fix something later rarely survive until Monday.
Printable Pre-Race Checklist
Use this list front to back before every session. Check bodywork, bumper, and Nerf bar hardware for tightness and stress cracks. Confirm wheel bearings spin freely with no drag or grinding. Torque wheel nuts and the spindle nut. Check the steering column and tie rods for play and confirm jam nuts are tight. Inspect fuel and brake lines for cracks and confirm clamps are secure and a filter is installed. Confirm the throttle cable has free travel and snaps fully closed. Check the brake pedal and master cylinder for leaks. Inspect the seat and seat stays for cracks. Confirm chain tension and retention are correct. Torque the engine mount and axle set screws. Confirm the clutch hub is seated against the crank shoulder. Spin the rear wheels on stands and confirm there is no rubbing.
Frequently Asked Questions About LO206 Mechanical Failures
How often should I re-torque LO206 fasteners?
Check critical fasteners, like exhaust, motor mount, and wheel nuts, before every event at minimum, and again after any session where the kart made contact with curbs or another kart. Vibration loosens hardware faster than most racers expect.
Why did my chain jump or come off mid-race?
The two most common causes are an under-torqued motor mount that allows the engine to shift, and incorrect chain tension. Both are five-minute checks that can prevent an otherwise avoidable did-not-finish.
Do I need a torque wrench for kart maintenance?
Yes. A basic click-type or beam torque wrench is inexpensive and removes the guesswork from wrench-tight. It also protects the aluminum and stamped steel fasteners common on kart chassis from being overtightened and stripped.
How do I protect my engine between race weekends?
If the kart will sit for more than a couple of weeks, drain the carburetor bowl, stabilize or remove old fuel, and coat internal components according to Briggs Racing's storage guidance. Ethanol-blended fuel left sitting is one of the most common causes of off-season carburetor problems.
Final Word
None of this is complicated, and most of it takes less time than a single lap. The racers who make this walkdown a genuine habit, rather than a once-a-season formality, are the ones who are not packing up early with a broken part in their hands.
If you are running a blueprinted LO206 from Kinetic Karting, many of the internal tolerances that cause long-term reliability issues are already handled for you at the build stage. The external items, including mounts, hardware, chain, and cables, are still on you every single race day.
If you need replacement hardware, a fresh chain, or want your engine inspected and blueprinted by us, reach out and we will help you get set up.
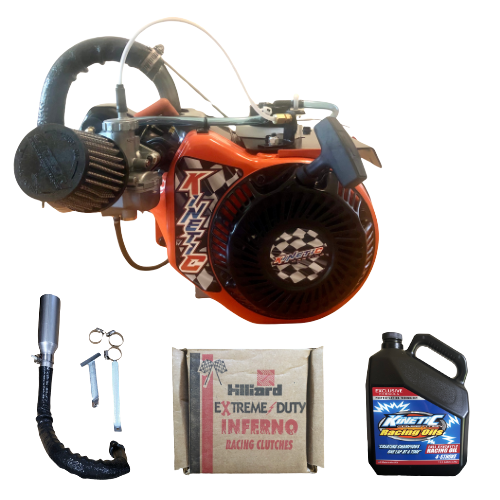



Brand new Briggs and Stratton LO 206 engine with blueprint enhancement and header exhaust kit.
Available slides: Kid Kart, Cadet Red, Sportsman Green, Junior Gold, and Adult Black.
The Kinetic Blueprint process involves the measurement and specification of every engine component to meet the highest industry performance standards. Process includes tear down, inspection, blueprint, reassemble, and break-in and tuning.
Blueprinting process requires 4-6 weeks to complete. We do offer a 2-week expedited blueprinting service if you require a faster turnaround. Expedited service can be added below.
Additionally, we ensure:
Cylinder head and carburetor are hand-picked and flowed.
Valve train parts are weighed and calibrated to optimize performance.
Fuel circuit is tuned precisely for the specific class
Liability Disclaimer: we are not responsible nor liable for any loss or damage incurred as a result of the use of the engine.